How to collect payment details and orchestrate charges with Stripe and Adyen
Build a secure and PCI-compliant checkout form to collect online payment details with a managed Piiano Vault and use it to orchestrate payments with Stripe and Adyen
Introduction
Piiano Vault enables you to securely charge a customer while keeping payment details safe. This feature is designed for scenarios where you need to handle customer payments in a PCI-compliant manner and store payment details for future transactions. You can find more details on these concepts in these guides:
- Collecting payment details using Piiano's iframe.
- Charging payment details from your backend.
This tutorial focuses on the payment orchestration between two providers, Stripe and Adyen. This approach has two main benefits:
- Avoiding a payment gateway provider lock-in.
- Allowing payments optimization by dynamically selecting the more cost-effective payment gateway for every transaction.
The tutorial uses a sandbox environment in the managed version of Vault. With minor adjustments, the same process can be applied to the on-prem version of Vault, where you would be responsible for hosting Vault within your PCI-compliant scope.
Solution overview
Prerequisites
You need an account on the Piiano Sandbox environment and a running Vault.
Sign up for a free sandbox environment if you don't have one.
Steps
- Create a Piiano Vault API key to communicate with Vault in your client code to tokenize the payment details.
- Create a collection in Piiano Vault to store the payment card details.
- Set up a form to collect payment card details.
- Create a different Piiano Vault API key to communicate with Vault from your server code.
- Invoke
http_callfrom your server code to charge the payment card details.
You’re responsible for your compliance with all applicable laws, regulations, and network rules when saving a customer's payment details online. For instance, if you save a customer’s payment method for future use, you need their consent. You must also provide a way for your customers to remove their payment details from your system.
⚠️ Only test payment methods are allowed with the Piiano hosted sandbox environment. Real payment methods can only be used on the production environment.
Step 1: Create Piiano Vault API key for the client
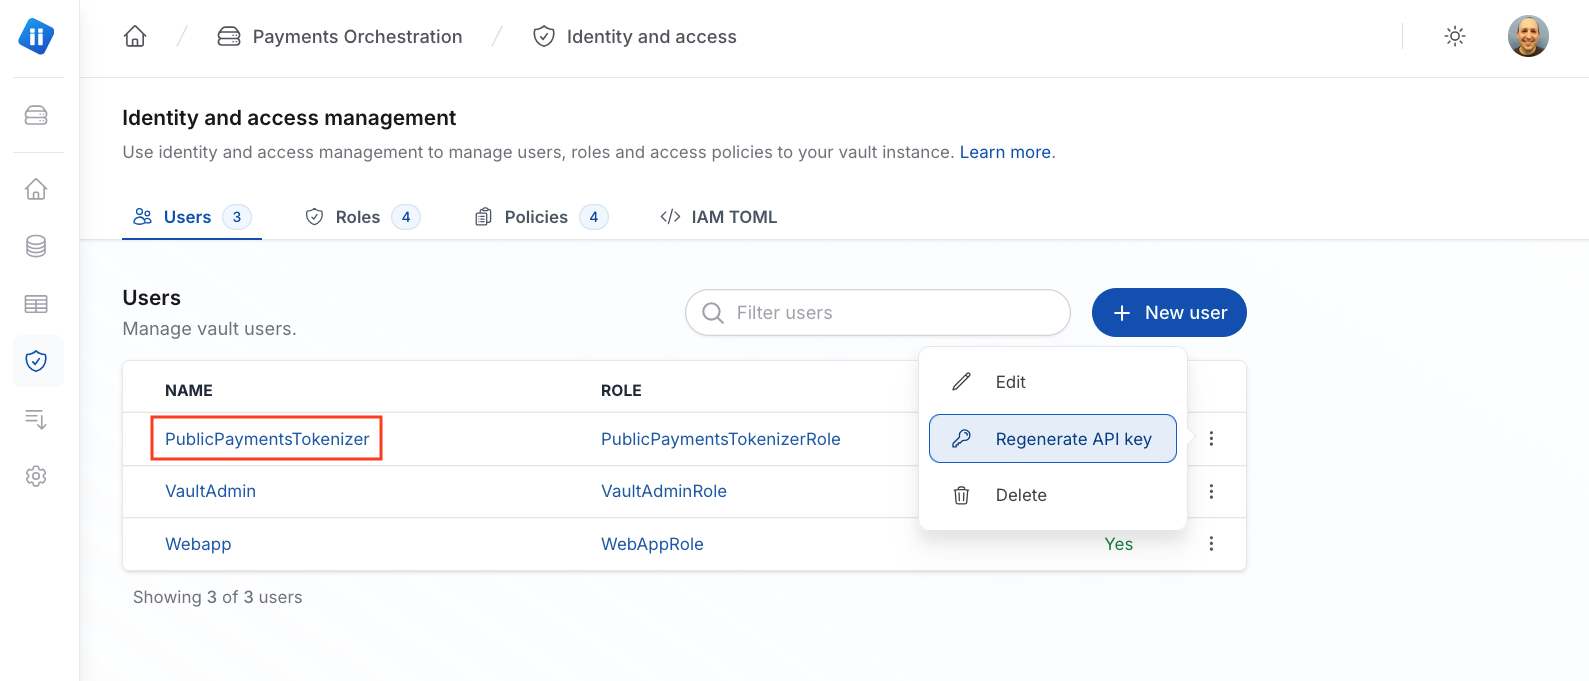
You need to create an API key for storing and tokenizing payment details. The tutorial uses a user and role included by default in the Vault sandbox. To create the key:
- Log in to your Piiano Vault account.
- Navigate to your Vault dashboard.
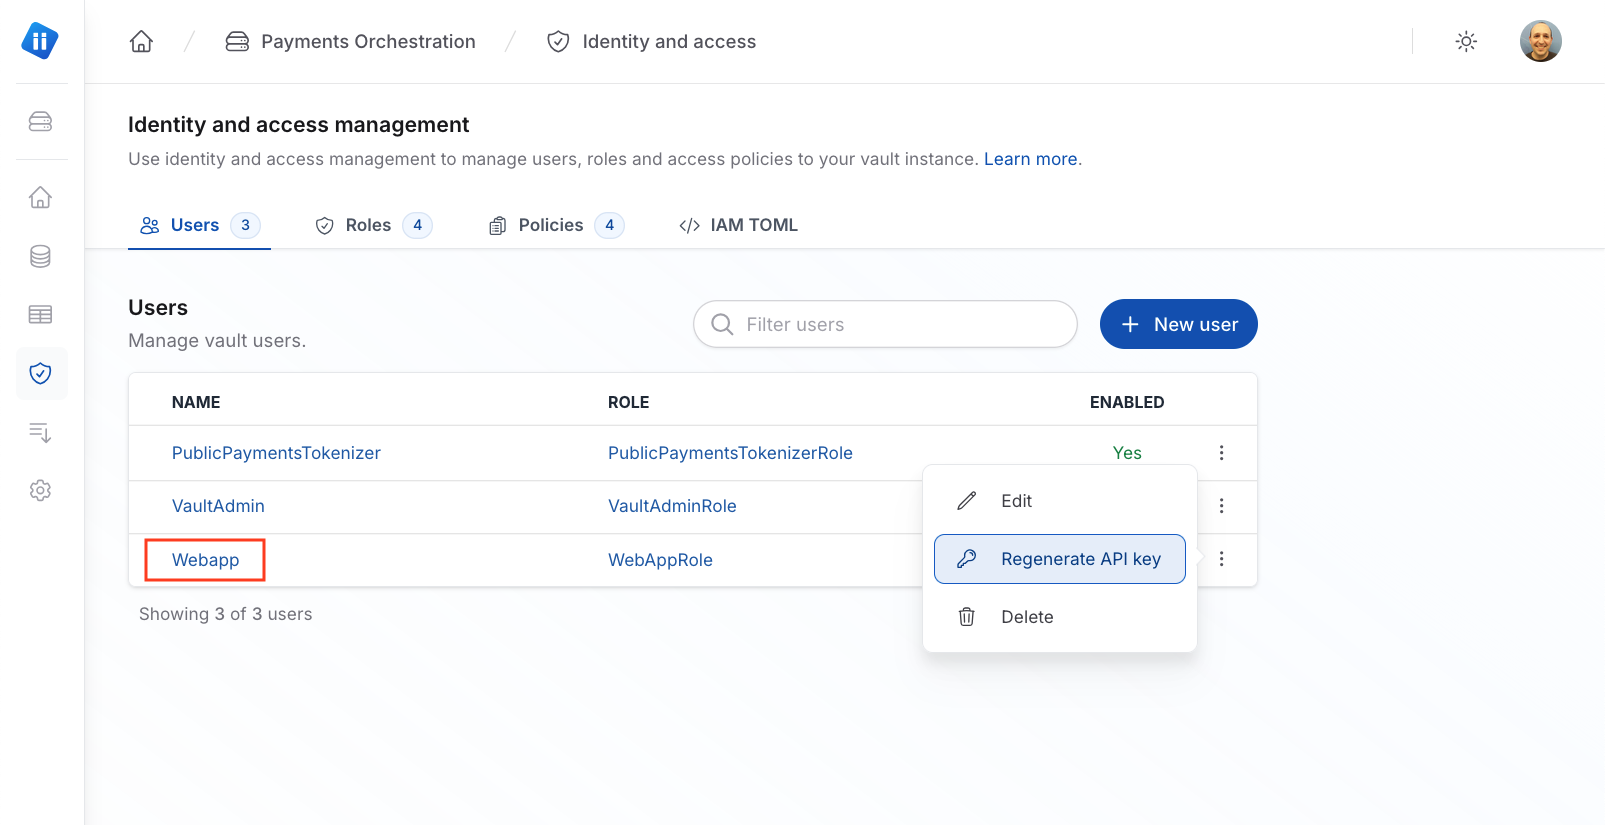
- Open Identity and Access from the left navigation.
- On the Users tab, find the user
PublicPaymentsTokenizer. - Ensure the user has the
PublicPaymentsTokenizerRolerole and isEnabled. - Open the user's hamburger menu (the three vertical dots) and select Regenerate API key. This action generates a new API key for the user. You can use this API key in the form to tokenize the payment details.
Step 2: Create a Piiano Vault collection
A Piiano Vault collection is a container for storing sensitive information. In this case, you require a collection to store the payment details. Piiano Vault includes a predefined template for this type of collection. To create your payment details collection:
- Select Collections from the left navigation.
- On the right, select the template Store payment cards to create a new collection.
- Leave the default settings unchanged: collection name of
paymentsand theholder_name,number,expiration, andcvvproperties. - Select Create collection.

Step 3: Set up your payment form to use Piiano Vault
You can now create your online payment form to store the payment details in the payments collection using a Piiano form and later charge that saved card.
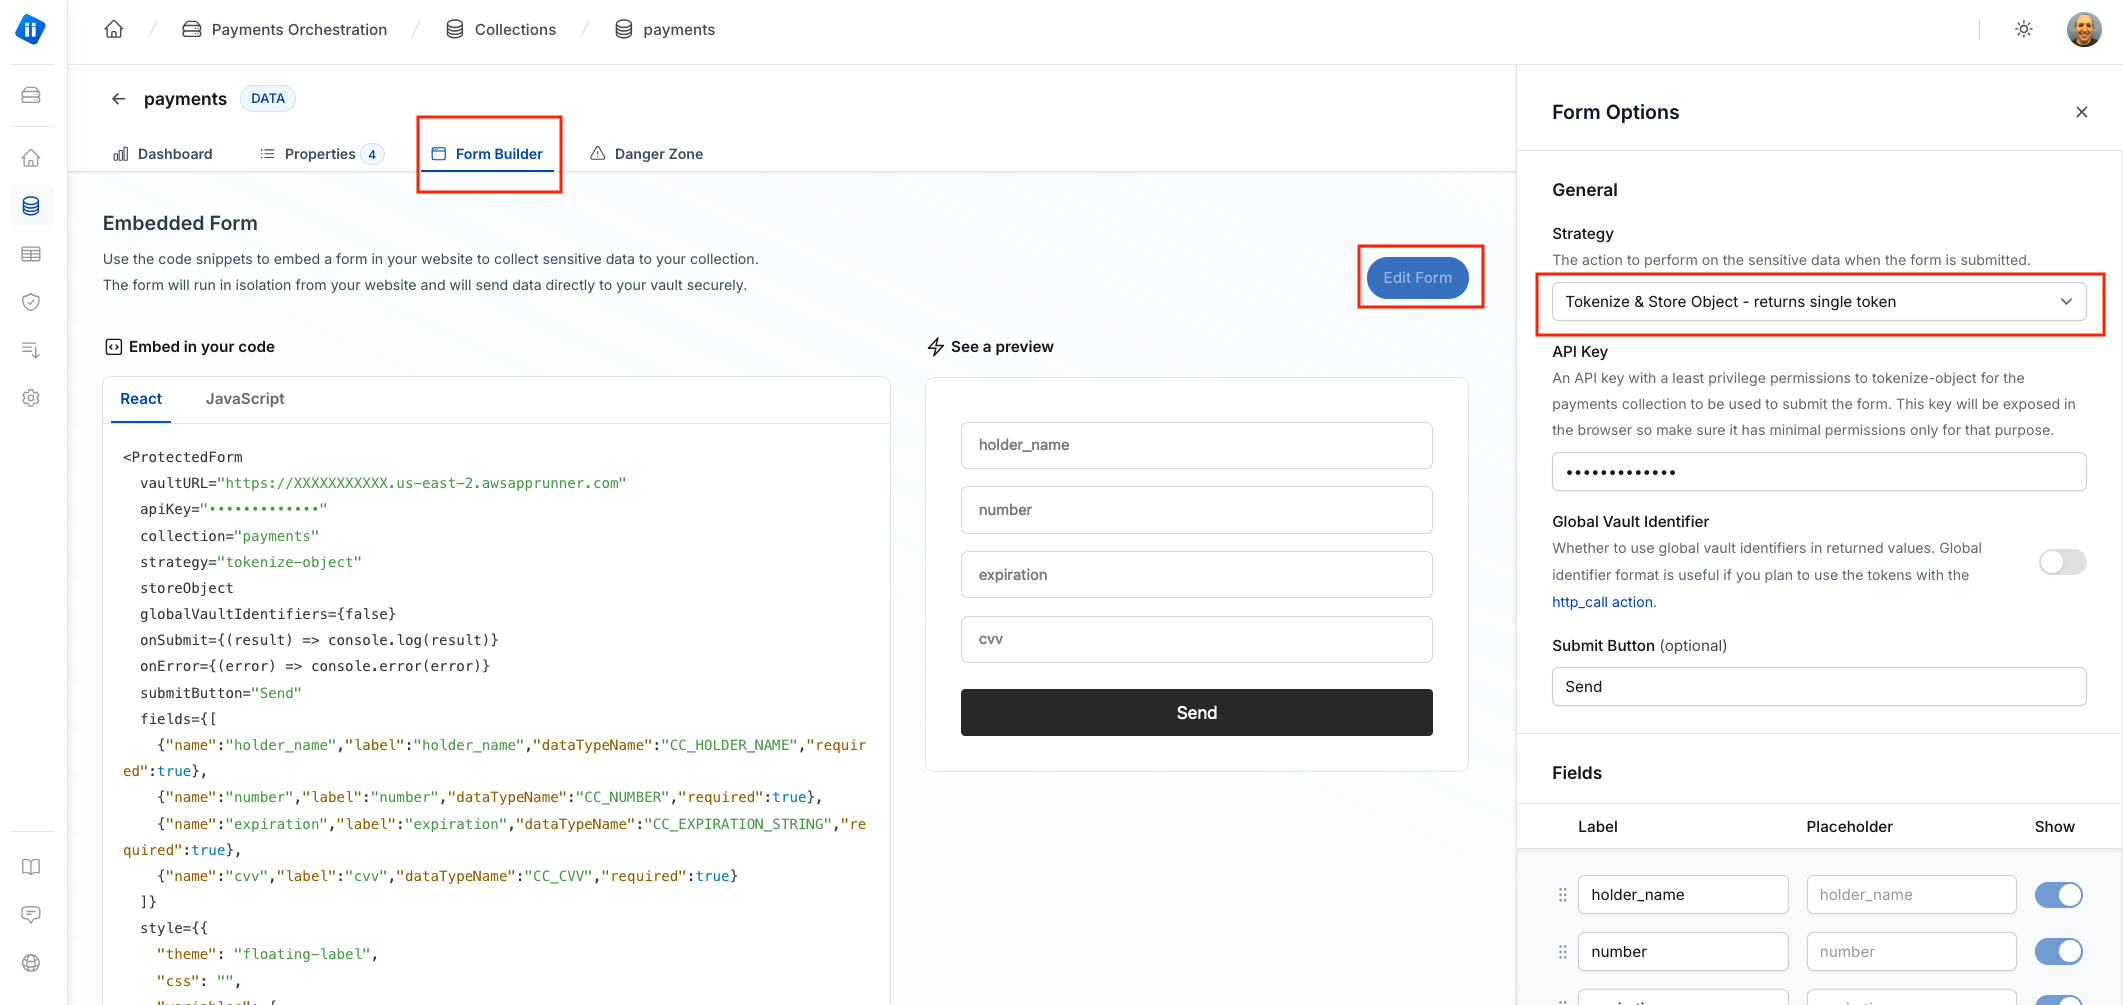
Use the online form builder in the collection tab to create the code to embed in your website. The code snippet generated downloads a library from the Piiano CDN (cdn.piiano.com) and then uses the pvault.createdProtectedForm function to create the form inside a new iframe.
Create the code
- Copy the code snippet from the application to your workspace. Alternatively, use the snippet and CSS from the Vault payments example.
- When the builder creates the snippet, it automatically injects the correct Vault endpoint for the
vaultURLparameter. Otherwise, replace this parameter with your Vault's endpoint value displayed on the dashboard. - Replace the
apiKeyin this example with the one you created in the first step of this guide.
How does the code run
The code demonstrates how to set up a form that collects payment card details and saves them in Vault. The form supports different behaviors when clicking the submit button, including saving the payment details as an object, encrypting it, and tokenizing it. The behavior is defined by a strategy parameter, and, in this case, it is set to tokenize-object to store the payment card and to return a token representing it. The onSubmit hook receives the Vault token, and from there, it is your responsibility to send it to your backend and use it there. You can then initiate payment immediately or keep the token to request payment later.
The returned result of the form
When the form is completed correctly and submitted, the data value received from Vault in the onSubmit hook is a Vault global identifier similar to this:
[ { "payment_details_token": "pvlt:detokenize:payments::8418dd21-50ec-49fb-b02e-9215032e1a23:" } ]
Where 8418dd21-50ec-49fb-b02e-9215032e1a23 is the ID for a token that represents the details stored in the Vault payments collection, details similar to this:
  "holder_name": "Jane Doe",
  "number": "4111111111111111",
  "expiration": "12/25",
  "cvv": "123"
Step 4: Create Piiano Vault API key for the server
You need to create an API key for invoking the charge of the payment details from your server code. The tutorial uses a user and role included by default in the Vault sandbox. To create the key:
- Log in to your Piiano Vault account.
- Navigate to your Vault dashboard.
- Open Identity and Access from the left navigation.
- On the Users tab, find the user
WebApp - Ensure the user has the
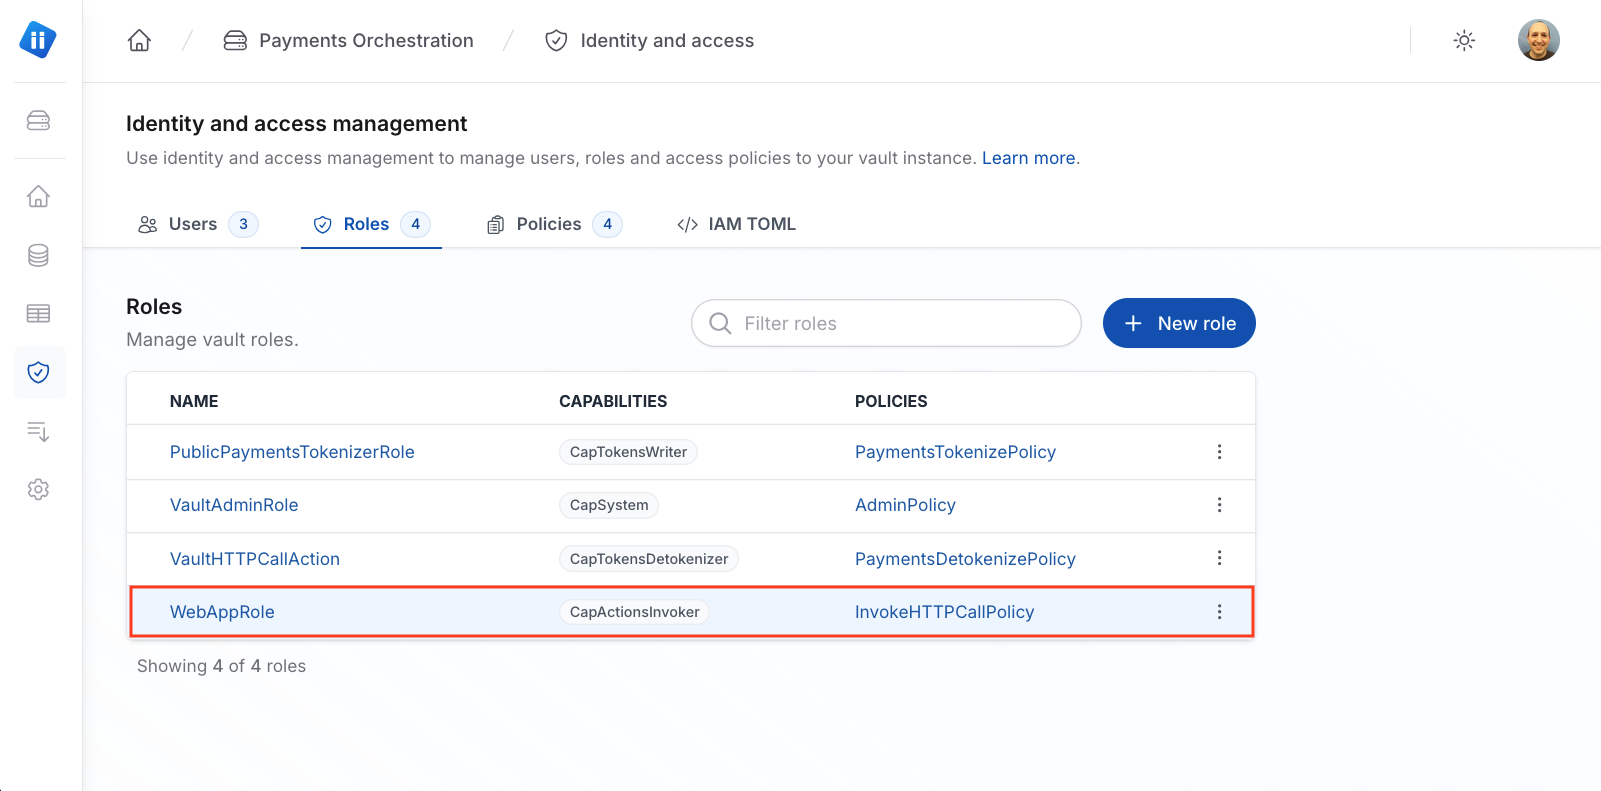
WebAppRolerole and isEnabled. - In the roles tab, ensure the
WebAppRolecontains theCapActionsInvokercapability and theInvokeHTTPCallPolicypolicy.
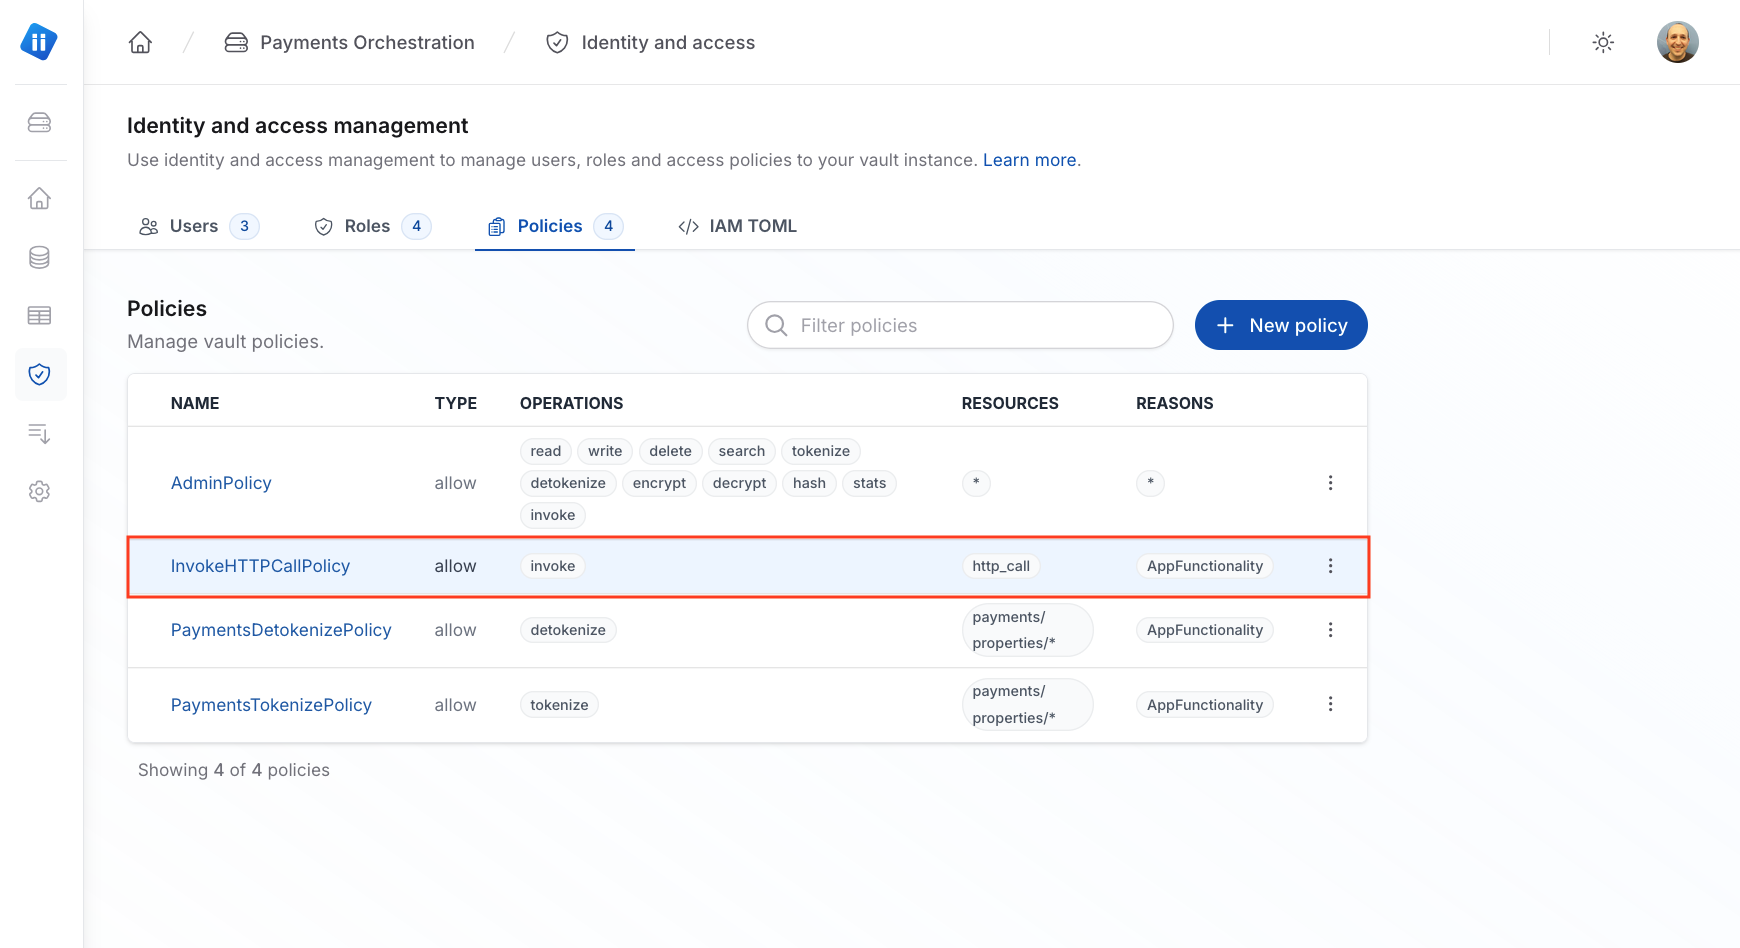
- In the policies tab, ensure the
InvokeHTTPCallPolicypolicy has anallowtype on theinvokeoperation for the resourcehttp_call.
- Open the user's hamburger menu (the three vertical dots) and select Regenerate API key. This action generates a new API key for the user. You use this API key to invoke the charge of the payment card details from your server code.
Step 5: Use HTTP_CALL to initiate payments from your backend
Examples are provided for charging your payment method with two payment gateways: Stripe and Adyen.
Stripe
To run this example:
- Download
stripe.tsfrom the Vault Payment Github repository. - Set your
StripeAPI key as the environment variableSTRIPE_API_KEY. - Call the
payWithStripe(<vaultUrl>, <tokenId>)function with the Vault endpoint and the token ID containing the Vault Global Identifier retrieved on the web form.
Adyen
To run this example:
- Download
adyen.tsfrom the Vault Payment Github repository. - Set your
AdyenAPI key as the environment variableADYEN_API_KEY. - Set your
Adyenmerchant account ID as the environment variableADYEN_MERCHANT_ACCOUNT. - Call the
payWithAdyen(<vaultUrl>, <tokenId>)function with the Vault endpoint and the token ID containing the Vault Global Identifier retrieved on the web form.