Get started in the cloud
Explore the basics of Piiano Vault
To get started and explore Vault, you can run Piiano Vault in a cloud sandbox that you can play with for 7 days. You can work with collections and objects using a convenient UI and example code for the CLI, REST API, JavaScript, and TypeScript. You can then use the CLI or API to continue exploring Vault features, such as transformations and tokenization.
This guide explains how to register your sandbox account and use the REST API to create a collection, add objects to that collection, and list the objects you've added. There are then some suggestions for how you can further explore Piiano Vault.
Step 1: Register for your cloud sandbox
Sign up with your GitHub or Google account, or use an email address. You're emailed a confirmation code. Enter the code and authorize Piiano Vault access to your Piiano Vault account. Review and close the welcome screen.
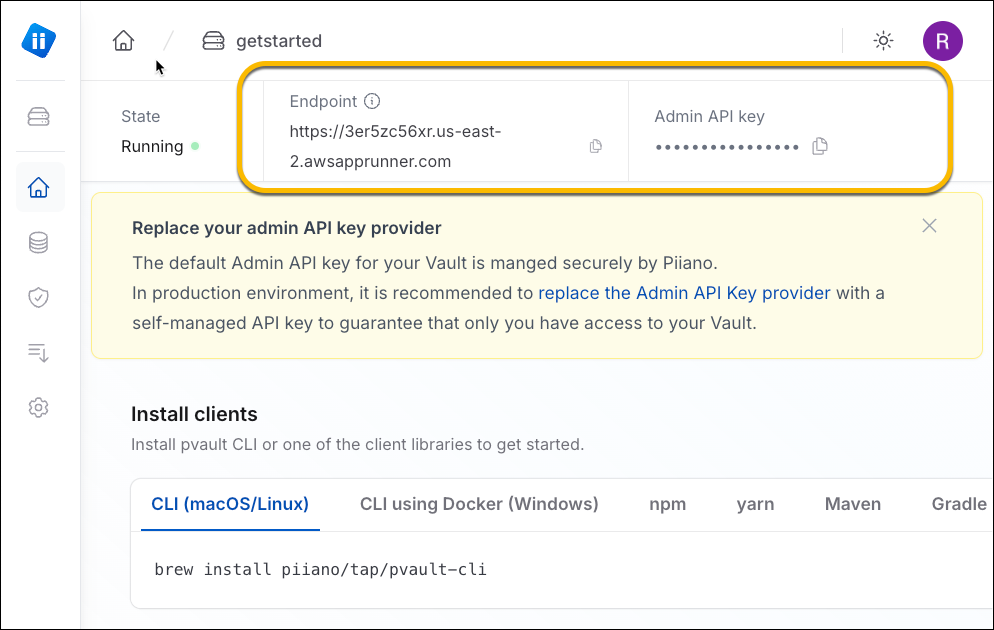
Step 2: Find your address and API key
You need the URL and API key for your sandbox to use the REST API. You find these at the top of the Dashboard page.
Step 3: Create a collection
Now add a collection to Vault. You create a personal information aware collection like this, using your sandbox URL and API key as appropriate:
curl --request POST \
   --url '<sandbox URL>/api/pvlt/1.0/ctl/collections?format=json' \
   --header 'Authorization: Bearer <API key>' \
   --header 'Content-Type: application/json' \
   --data '{
  "type": "PERSONS",
  "name": "customers",
  "properties": [
    {
      "description": "Date of birth",
      "name": "date_of_birth",
      "data_type_name": "DATE_OF_BIRTH",
      "is_nullable": true
    },
    {
      "description": "Email",
      "name": "email",
      "data_type_name": "EMAIL",
      "is_unique": true,
      "is_index": true,
      "is_nullable": true
    },
    {
      "description": "First name",
      "name": "first_name",
      "data_type_name": "NAME"
    },
    {
      "description": "Last name",
      "name": "last_name",
      "data_type_name": "NAME"
    },
    {
      "description": "Phone number",
      "name": "phone_number",
      "data_type_name": "PHONE_NUMBER",
      "is_unique": true,
      "is_index": true,
      "is_nullable": true
    }
  ]
}'
From which you get a response similar to this:
{
  "type": "PERSONS",
  "name": "customers",
  "properties": [
    {
      "description": "Date of birth",
      "name": "date_of_birth",
      "data_type_name": "DATE_OF_BIRTH",
      "is_unique": false,
      "is_index": false,
      "is_encrypted": true,
      "is_nullable": true,
      "is_builtin": false,
      "is_readonly": false,
      "creation_time": "2024-08-21T00:06:38.182958Z",
      "modification_time": "2024-08-21T00:06:38.182958Z"
    },
    {
      "description": "Email",
      "name": "email",
      "data_type_name": "EMAIL",
      "is_unique": true,
      "is_index": true,
      "is_encrypted": true,
      "is_nullable": true,
      "is_builtin": false,
      "is_readonly": false,
      "creation_time": "2024-08-21T00:06:38.182958Z",
      "modification_time": "2024-08-21T00:06:38.182958Z"
    },
    {
      "description": "First name",
      "name": "first_name",
      "data_type_name": "NAME",
      "is_unique": false,
      "is_index": false,
      "is_encrypted": true,
      "is_nullable": false,
      "is_builtin": false,
      "is_readonly": false,
      "creation_time": "2024-08-21T00:06:38.182958Z",
      "modification_time": "2024-08-21T00:06:38.182958Z"
    },
    {
      "description": "Last name",
      "name": "last_name",
      "data_type_name": "NAME",
      "is_unique": false,
      "is_index": false,
      "is_encrypted": true,
      "is_nullable": false,
      "is_builtin": false,
      "is_readonly": false,
      "creation_time": "2024-08-21T00:06:38.182958Z",
      "modification_time": "2024-08-21T00:06:38.182958Z"
    },
    {
      "description": "Phone number",
      "name": "phone_number",
      "data_type_name": "PHONE_NUMBER",
      "is_unique": true,
      "is_index": true,
      "is_encrypted": true,
      "is_nullable": true,
      "is_builtin": false,
      "is_readonly": false,
      "creation_time": "2024-08-21T00:06:38.182958Z",
      "modification_time": "2024-08-21T00:06:38.182958Z"
    }
  ],
  "creation_time": "2024-08-21T00:06:38.182958Z",
  "modification_time": "2024-08-21T00:06:38.182958Z"
}
Step 4: Add data
Now add some data to the collection:
curl --request POST \
   --url '<sandbox URL>/api/pvlt/1.0/data/collections/customers/objects' \
   --header 'Authorization: Bearer <API key>' \
   --header 'Content-Type: application/json' \
   --data '{
  "date_of_birth": "1993-02-22",
  "email": "patfar@example.com",
  "first_name": "Pat",
  "last_name": "Far",
  "phone_number": "+11011010101"
}'
💡 When adding objects without an ID, Vault automatically generates a GUID for each object.
As you add each person, you get a response similar to this providing the ID of the object added:
{
  "id":"b4ee3854-234d-4d16-9b97-2dd0403f54bb"
}
Data in Vault is encrypted at rest. Vault provides automatic key provisioning and rotation. Data is also protected with granular access control and audited access.
Step 5: Query your data
You can return a combination of plain and transformed data in a query. Transformations desensitize personal information. Vault includes built-in transformations, and you can add custom transformations. Each transformation can act on data of the same type, such as email, phone number, or SSN.
This request returns first and last names as stored and a masked version of the email address for the data you added:
curl --request GET \
   --url '<sandbox URL>/api/pvlt/1.0/data/collections/customers/objects?props=first_name,last_name,email.mask' \
   --header 'Authorization: Bearer <API key>' \
This returns:
{
  "results": [
    {
      "email.mask": "p*****@example.com",
      "first_name": "Pat",
      "last_name": "Far"
    }
  ],
  "paging": {
    "cursor": "",
    "size": 1,
    "remaining_count": 0
  }
}
Step 6: Continue exploring Vault features
To continue exploring Vault:
- using the REST API: follow the Try your API endpoints online link on the dashboard page. Click List collections and, in the Try the API sidebar, paste your admin API key into API key. Click Try it, and you get a list of the collections in the sandbox. You can then check out the rest of the API reference to discover more operations and the guides for information on performing various tasks. The guides assume you're using a local copy of Vault, so you need to modify the examples to reference your sandbox and the data created in your collection.
- using the CLI: the dashboard page includes instructions to set up the CLI. The get started with the CLI in a local copy of Vault provides an introduction to creating collections and adding and listing data. You need to modify the CLI commands to reference your sandbox by setting it in the
--addrflag of each call or adding it to the local environment variable$PVAULT_ADDR. Then, check out the CLI reference to discover more commands and the guides for information on performing various tasks.
If you're using the hosted version of Vault, the SaaS console displays the URL for your installation.
Other things to explore
- Learn how to configure your deployment or manage users and policies.
You can also talk to us about your deployment and hosting needs.